DMG DentaMile Desk MC system
Quick Start Guide
Thank you for your interest in our DMG DentaMile Desk MC system. In order to get you started as quickly as possible, we have put together a small guide with 11 simple steps for this plug & play solution.


Set up the devices in a place that is dry, free from dust and away from direct sunlight.
-
Plug the devices into the mains (printer: on the left side; other units: on the back).
-
Switch the devices on.
The printer has to be connected to the internet. This can be done either with a LAN cable or with WiFi.
-
To do this, the LAN cable can be connected to the LAN socket on the left side of the printer.
-
To connect the printer to the internet with WiFi, click on “Engineering Mode” in the menu, then “WLAN”, then select your preferred WiFi network and enter the password.


Installing DentaMile CAM MC
In order to create a print job and 3D design data for your 3D printer (nesting, supporting and slicing), you will first need to install the software for the DentaMile CAM MC.
-
Click the following link to download the slicing software DentaMile CAM MC.
-
Next, install the DentaMile CAM MC software on your Windows work computer.
This is the full version of the DentaMile CAM MC software and it can be used for a 30-day trial period. Before this period comes to an end, the DentaMile Support Team will automatically email you a personal licence key. This licence key will allow you to use the software in full on a total of two separate work computers.
When using the software for the first time, you will need to complete the following settings. In the set-up menu:
-
Select a language option
-
Under “Layout” select “Advanced Interface”.
-
Click on ‘OK’.
-
In the next window, confirm that you want to continue using the trial version.
-
In the following window, select the DentaMile Desk MC-5 printer.
-
Confirm your selection by clicking “OK”.

Creating design data in your preferred CAD program
Open your preferred CAD program to create your 3D design data (e.g. bite splint, die model, drilling template, custom function tray). When you have finished creating your design, save it as an STL file on your computer.

Preparing a print with DentaMile CAM MC
If you have not yet done so, open your DentaMile CAM MC software.
-
Select your printer (DentaMile Desk MC-5).
-
Select the material you want to use.
-
Click on “OK” to start the process of preparing a print.
On the right side of the screen, in the centre, you will be shown a toolbar that will guide you through the entire process of preparing the print.
-
Click on the first icon (folder with green tick) to import the STL design data you created earlier into the DentaMile CAM MC.
-
Next, place (nest) the uploaded STL file on the virtual build platform anywhere you like. To do so, use the object navigation tool (coloured arrows on the object).
-
To attach the supporting structures (supports), click on the third symbol (the “A” below a blue bar) in the toolbar.
-
Select the right supporting profile for your object (e.g. “DMG LP Ortho Plus”, for printing a bite splint) from the options below the toolbar.
-
Under “Support generation”, select either “Auto-Generate All” or “Auto-Generate Selected”, to get the system to automatically create the supporting structures.

Slicing and saving the print job
Click on the last button on the toolbar (small triangle on horizontal blue lines), which will open a new window.
-
Check the file name in the new window and change it if required.
-
Select a location for saving the print job (printable file).
-
Check the selected printer.
-
Make sure that you have selected the right printing material and layer thickness for your print object (e.g. “DMG LP Ortho Plus -100µm-”). If not, adjust the relevant setting.
-
Next, click on “OK, start slicing” to create the print job for your DentaMile Desk MC-5 printer.
-
If you have not yet saved the printable file on a USB stick, open the folder where you have saved the printing job and copy it (.3dp file) to a USB stick.

DentaMile connect is DMG’s cloud-based integrated digital workflow solution. Used together with the DentaMile connect Producer Option, DentaMile connect allows you to directly send your workflow designs to your DentaMile Desk MC-5 printer without requiring any knowledge of CAM.

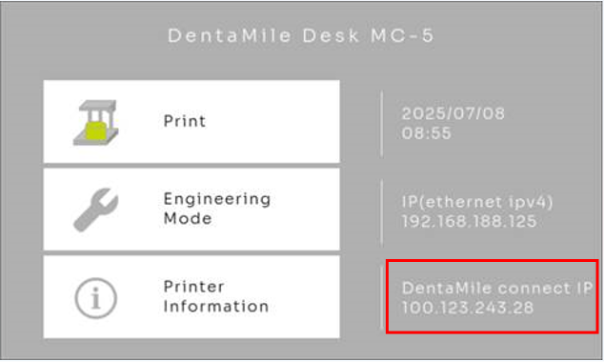
Preparations: Make sure that the MC-5 printer is switched on and connected to the Internet.
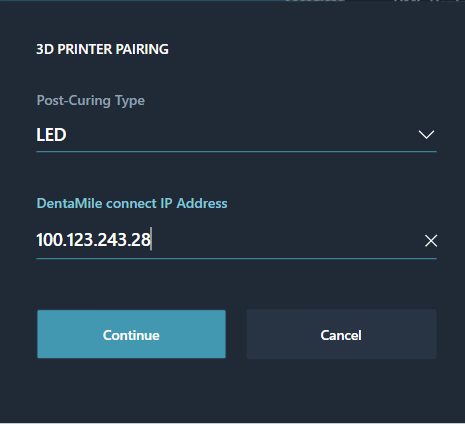
Navigate to the start screen from the printer menu (house icon). Make a note of the “DentaMile connect IP address”
Log in at www.dentamile-connect.com with your profile.
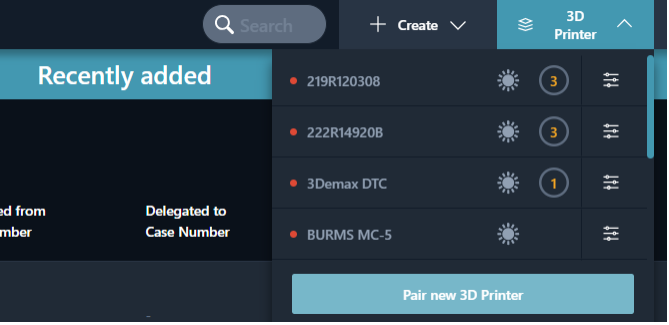
- Navigate to “3D printer” in the top right-hand corner of the program.
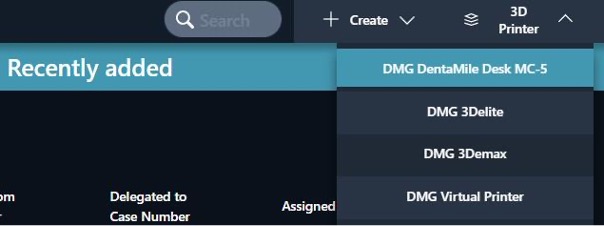
- Click on “Connect new printer”.
DentaMile connect design workflow
With the DentaMile connect Designer and Producer options, you can, among other things, select from a number of different workflows for creating dental appliances (e.g. bite splint workflow, bleaching tray workflow) within DentaMile connect. Simply select the required workflow, follow the instructions provided and create your 3D design.

Preparing a print with DentaMile connect
In the Producer option, you have the option of remotely selecting your printer (which you will have previously connected) at the end of the design workflow, and of sending the print job directly to your DentaMile Desk MC-5 printer, irrespective of its location (provided it is switched on and connected to the Internet). The nesting, supporting and slicing processes will all be performed automatically for you in the cloud.

Please observe the following: Always wear gloves when working with 3D printing materials or isopropyl alcohol.
Before using your 3D printer for the first time, you will need to prepare the printer for the pending print job.
-
Remove the transit supports (polystyrene blocks).
-
Remove the magnetic build platform and the Flex plate from the packaging.
-
Attach the Flex plate to the centre of the build platform, making sure that the matt side of the Flex plate is pointing away from the build platform.
-
Clean the Flex plate with a lint-free paper towel and a small amount of isopropyl alcohol.
-
Attach the build platform and Flex plate to the top holder inside your printer by tightening the fastening screw.
-
Open the two fasteners on the material tray and take it out of the print chamber.
-
Select the relevant material for your print object (e.g. LuxaPrint Ortho Plus) and read and follow the material user instructions, such as shaking the material before use.
-
Fill the material tray (approx. 200 g material) outside the printer with the relevant printing material for your print object.
-
Place the material tray back inside the printer and tighten the fasteners by hand.
-
Close the lid to protect the light-sensitive material from drying out.
For more information, please refer to the DentaMile Desk MC-5 user manual.
Printing from a USB stick (DentaMile CAM MC)
If you have saved the print file (.3dp) on a USB stick, insert the USB stick into the USB port on the left side of the printer.
-
Press the “Print” button on the display.
-
Open the folder on your USB stick in which the print job is stored and select it.
-
Follow the instructions shown on the printer’s screen and start the printing process.
Once the printing process has been started, you can remove the USB stick.
Printing a print job via a DentaMile connect workflow
If you sent a print job to your printer directly from the DentaMile connect workflow, it will be saved on your 3D printer. This process may take a couple of minutes to complete.
-
Press the “Print” button on your printer
-
Select the “machine” folder.
-
Select the print job with the corresponding DentaMile connect case ID.
-
Follow the instructions shown on the screen and start the printing process.

Please observe the following: Always wear gloves when working with 3D printing materials.
To continue with the next steps for working on your print object, first (ideally) leave it to dry inside the printer for about 10 minutes and then remove it from the build platform.
-
To do so, remove the build platform together with the Flex plate and place them on a wipeable surface.
-
Use the supplied spatula to carefully remove your print object from the Flex plate mounted on the build platform.
If you have printed dental models, you can take the Flex plate off the build platform and carefully and gently bend it. This will make the models detach from the Flex plate without the need to use a spatula.


Next, the liquid material residues left on the print object must be removed.
-
To do so, place the printed objects inside the DentaMile Wash MC filled with isopropyl alcohol.
-
Close the lid and lock it.
-
Switch on the DentaMile Wash MC if it is still switched off.
-
Select the “Low” programme.
-
Set the timer to 5 minutes.
-
Start the cleaning programme.
Always make sure to remove your print objects from the isopropyl alcohol once the 5 minutes has elapsed as leaving them longer can impair their mechanical properties and any biocompatible properties.


To make sure that your print object will obtain its final mechanical properties and any biocompatible properties, it will have to be exposed to post-curing treatment.
-
Mount the supplied glass plate in the middle position with the aid of the holders.
-
Switch on the DentaMile Cure MC if it is still switched off.
-
Place your print object on the glass plate inside the DentaMile Cure MC.
-
Click on the “Favourites” button (in some of the older versions, this button might also be called “Standart”) at the bottom of the main menu.
-
Select the relevant programme for your object from the list (e.g. “LP Ortho Pls”).
-
Start the post-curing programme.
Every material has its own specific post-curing programme and must only be treated with that programme to ensure its properties are not affected. If you cannot find the programme you are looking for under “Favourites”, please get in touch with our DentaMile Support Team at +49 800 840 066 6 or supportdigital(at)dmg-dental.com.

To make sure that your digital 3D printing process will always be smooth and give rise to high-quality prints, it will be necessary to regularly inspect and service your system.
General checks before every print job
-
Remove any hardened material from the material tray with a plastic spatula. Attention: DELICATE - Do not use sharp / metal objects!
-
Remove any hardened material from the build platform with a spatula. The Flex plate’s surface must be completely clean and even before a print job is started.
-
Check the material tray for leaks.
Daily printer checks
Check the glass base is completely clean (no dust, resin or streaks). Dust, material residues, oil, fingerprints and other kinds of contaminants can significantly impact the quality of the print and could cause printing errors. If necessary, clean with isopropyl alcohol (ISO) and then with a glass cleaner. If the glass is completely clean, the mirror reflection of the ceiling light will not show any streaks or dust.
Weekly system checks
-
Check the DentaMile Desk MC-5 printer’s light intensity with the supplied UV sensor. For more information, use the QR code on your UV sensor.
-
Check the parallel alignment of the build platform.
-
Check the container of the DentaMile Wash MC for residues and material deposits at least once a week. To do so, remove the container and empty the isopropyl alcohol into a separate container (e.g. empty isopropyl alcohol bottle). Pour some fresh isopropyl alcohol into the container and gently shake it. Next, dispose of the isopropyl alcohol in line with local regulations.
-
Check the glass insert in your DentaMile Cure MC for scratches and contaminations at least once a week. If necessary, clean the glass insert with a lint-free cloth with isopropyl alcohol and glass cleaner. If the glass insert is heavily scratched, replace it.
Annual printer system service
To maintain the validation of your system, it will have to be serviced once a year by our partner. The service ensures that your printer’s light output has not changed and that your system is always up to date. For more information, please don’t hesitate to get in touch with our DentaMile Support Team at supportdigital(at)dmg-dental.com.
DentaMile Service and Support
If you have any questions or are encountering any problems with the printing process, please don’t hesitate to contact our regional sales department or DentaMile Support Team (Tel.: +49 800 840 066 6, E-Mail: supportdigital(at)dmg-dental.com).
Do you have questions?
The DMG Service Center Digital will be happy to assist you!
- 0049 40 84 00 66 66
- (fee-based, in English)
- supportdigital(at)dmg-dental.com
- Write email